Sunday, December 21, 2014

Happy Hanukkah

It's been a full week of baking, cooking, gifting, and partying.  I think I can honestly say "I'm done" - for now :)


Friday, September 19, 2014

Yom Tov Challah


Yom Tov Challah

2 pkg. yeast, 4½ tsp.
1½ c. warm water
½ c. sugar or honey
6 – 6½ c. bread flour
2 tsp. salt
½ c. oil
3 eggs + 1 for egg wash

(For Rosh Hashanah – use honey in place of sugar and 1 tsp. vanilla extract)

In the bowl of a mixer fitted with a dough hook, place the water and sprinkle with the yeast.  Mix gently until dissolved.  Add the oil, eggs, sugar  (vanilla, if using) and about half of the flour.  Blend on low until well combined.  Add the salt and continue slowly adding flour to the dough until it begins to pull away from the sides and form a ball.  Knead the dough in the mixer or by hand for another 5-10 minutes adding any remaining flour, if needed.  Place the dough in a large, oiled bowl and cover with plastic wrap.  Allow to rise for 1 to 2 hours.  Alternatively, the dough can be placed in a large container with a cover and placed in the fridge overnight.  To form the loaves, divide the dough into 2-3 pieces.  Roll the lengths into long ropes (about 18" long).  Holding one end, wrap the rope around in a spiral. tucking the end under the loaf.   Place loaves on lined baking sheet.  Brush with egg and sprinkle with poppy or sesame seeds or with a streusel topping*(see below).  Allow to rise a second time for about 20 - 30 minutes.  Preheat the oven.  Bake for 40- 45 minutes at 350˚F.  Allow the loaves to cool on a rack.

If adding raisins, flatten out the lengths of dough before shaping in to ropes, add the raisins and roll back into ropes.  Also, chopped apple can be added in the same way.

*Streusel Topping:
Mix equal parts Sugar, brown sugar, flour, a good sprinkle of cinnamon and just enough oil to make a crumbly topping.

Makes 2 large loaves.  Can make 3 smaller loaves, only bake 35-40 minutes.

Friday, August 29, 2014

Rainbow Birthday Party


Here are some of the details from Miss D's 8th Rainbow Birthday Party. I already described the cake in all it's glory in a previous post.  So now I want to share a bit more.  The bunting for the party was really simple to do with a stack of  rainbow colored felt from the craft store.  I bought two of each color and then a couple of white as
well.  I cut each 8" x 12" sheet in two and then notched out a triangle on the bottom of each.  I cut out the lettering from white felt and just used a little craft glue to attach it.  I then used a hole punch at each top corner to make a hole to thread some ribbon and there you go!

On to the food.  Of course the rainbow theme needed to continue to the food.  I decided to do a rainbow fruit tray in lieu of the skewers.  I knew there would be some younger siblings present and I always worry about those sharp sticks in young hands.  


We also had some veggies and snack mix.  Somewhere along the way it has become tradition to have veggie sushi as well for birthday celebrations.  This recipe is the one I basically follow.  I usually do veggie sushi because it's not as intimidating ( for those that haven't yet tried sushi) and it also holds up well on a buffet table.  


Meringues with rainbow sprinkles.  I love meringues.  They're light and sweet and just fun to have at a party.  The only issue is the weather.  Humid summer birthdays means that they need to be kept in a sealed container until right before the party.  Even still, they may get a bit sticky and soft by the end of the party.  As a side note:  those sticky, soft meringues are perfect with ice cream- trust me :)


Rainbow Jello.  Yes, I realize I painstakingly made the cake with all natural dyes and then go and add multi-colored jello to the mix.  I know.  I really couldn't help myself.  There are many recipes for this layered jello around.  Basically it involves making a batch of each color and layering it with a lighter version of the color and letting it set up in the fridge.  It's not a difficult dessert at all, but it TAKES TIME!  I used small (4 oz.) jelly jars and only used a tablespoon or two of each color to layer.  You need to wait in between the layers until they are set before adding the next, but it will go a bit faster with each progressive layer as it chills. This is the recipe I based it on - minus the alcohol of course!  


I have mentioned before how it has become a tradition at each birthday to have these shortbread cookies. I made two versions for this birthday.  Number eight ones and a "color your own cookie" variety. The eight cookies were frosted and decorated with sprinkles.  I used these for the favor bags.  The rectangle cookies were simply frosted with royal icing and allowed to dry firm.   I placed some food writer marker next to the plain rectangle cookies so that the children could decorate their own (although I think perhaps the adults had more fun with this activity).


And just in case there wasn't enough, I made cupcakes as well.  These were strawberry cupcakes with a strawberry cream frosting.  YUM!


The decorations outside kept with the theme.  I used bandannas folded as pinwheels for each place setting and rainbow pinwheels as the table decoration.


And a rainbow pinata I made with a balloon base and a paper cone attached to the bottom.  Always a hit with the kids - HA!    


Thanks for checking the party out.  If you would like, you can check out the cake I made for the party too!


Thursday, August 28, 2014

Rainbow Tie-Dye Cake

Still going back in time to catch up on posts.  This time for Miss D's eighth birthday.  It was the last party at our house in Georgia...sigh.  It was a great one though.  Lots of good food and lots of really wonderful friends!  Miss D wanted a rainbow party and that's exactly what we delivered.  

The cake:  Ok, so rainbow birthday and the immediate thought is the rainbow cake.  You know the one.  The towering stack of brightly candy colored layers of cake.  Been there, done that.  Looks cool in pictures and definitely is stunning to cut into, but not always a joy to eat with the artificial colors.  I knew I wanted something a bit different, but still along the rainbow theme. I researched online for some natural dye bases to give the cake the rainbow effect.  I knew that the colors wouldn't be quite as vibrant as the artificial so I decided to use a layering technique for the batter to give a tie-dye effect.  Instead of baking each layer separate, the colored batter gets poured into the pan in succession.  As the next color is poured into the pan, it helps spread the color(s) next to them.  The key is pouring slow and steady.  So for instance, one cake I poured them in the ROYGBV order, and then in the next pan, I poured them in the opposite order VBGYOR to add to the tie-dye effect.  I think the pictures below probably explain it better than I can.  This cake looks innocent and simple enough on the outside, but it's the inside that is really the "wow" part of the cake.  Apart from a small amount of decoration on the outside fondant layer, the cake is all natural color and flavors.  Woohoo!   


Ready to go in to the oven.
And out of the oven and cooling.
Alright, so I started out with a good white cake recipe.  I made four batches of it.  Each batch I divided into six bowls and colored with about a tablespoon or so of natural dye.  One batch was baked in two 8" square pans.  The remaining three batches were baked in a large 9" x 12" pan.  This is the white cake recipe I used:

White Cake  (adapted from The Southern Heritage Cakes Cookbook, Southern Living Books, 1983) 
1/2 cup shortening
1 1/4 c. sugar
2 cups cake flour
2 1/2 tsp. baking powder
1/2 tsp. salt
3/4 c. milk
1 tsp. vanilla extract
3 egg whites, at room temperature

Preheat oven to 350 degrees.
In the bowl of a large mixer, cream shortening with sugar until light and fluffy.  In a separate bowl, combine flour, baking powder and salt.  Measure out milk and add vanilla extract.  Add flour to creamed mixture alternately with the milk.   Be sure to begin and finish with the addition of flour.  In a clean bowl, beat egg whites to stiff peaks.  Fold the egg whites gently into the batter.

For the Rainbow Tie dye effect:
Divide batter between 6 small bowls.  To each bowl you will add about 1 tablespoon of natural dye.    Fold dye into batter until incorporated.  Pour into prepared pan in the order that you wish to see the colors.  Begin pouring batter in the center of the pan and slowly add each color in succession.  The color you add first will end up on the outside and bottom of the cake, the last color you add will remain toward the center. Bake at 350 degrees for 20 - 25 minutes.   Cool cakes in the pan 10 minutes before removing to cooling racks.
::
Natural Dyes:  I needed about 1/4 cup total for a quadruple recipe of the white cake.  Now, I will confess I really wish at this point I had a juicer on hand to make these dyes, but I didn't and it really was do-able with just a mini-food processor and a strainer.  For all of the dyes (except the yellow), I took about a 1/2 cup of raw vegetable/fruit, pureed it in the mini processor and then strained it into a separate bowl.  You may need to use a rubber spatula to press the puree a bit and squeeze out the juice.  

Red: I used canned beets for this.  
Orange: Carrots, or you can buy carrot juice.
Yellow: One egg yolk (for each recipe so, 4 egg yolks total)
Green: Fresh spinach, or buy spinach juice.
Blue: Use fresh or frozen (thawed) blueberries.
Purple: Fresh or frozen (thawed) blackberries.

I used a cream cheese frosting in between the layers and a vanilla butter cream frosting for the outside of the cake.  Why two frostings you ask?  Well, this was Georgia, in June, and hot, hot, hot.  The butter cream is a bit more stable and able to withstand the heat, but with the faint hint of fruit and vegetable flavors in the cake (not overwhelming though) the cream cheese was a natural balance.    Again as with many of my cakes, I used  marshmallow fondant for the outside.  I left it naturally white.  I wanted a cloud-like effect.  I made a few clouds out of royal icing.  I used a bit of extra fondant and had the birthday girl cut out shapes and decorate them with food writers.  She was thrilled to say that she helped decorate the cake and I think it made it very sweet.  You can see some stars and flowers that she decorated and I attached to the outside layer.  

Putting it together.
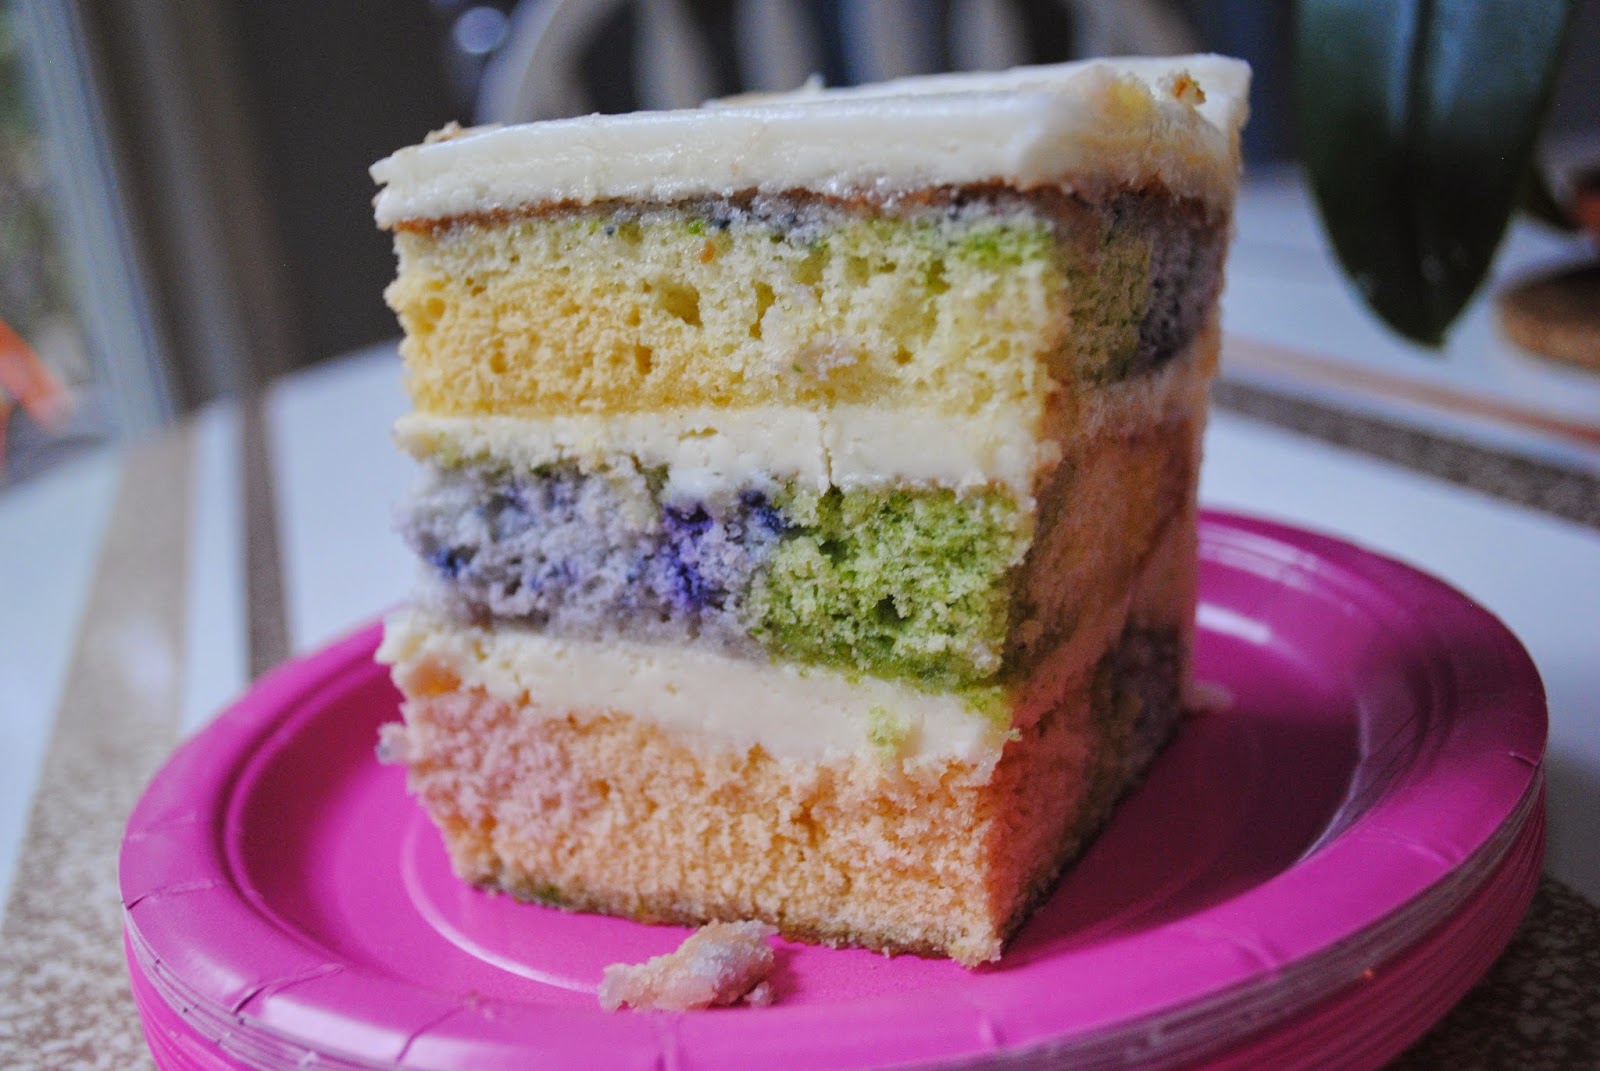


Yum!


Wednesday, August 27, 2014

Spiderman-Basketball Birthday

Spiderman-Basketball Birthday Party

  I am going back in  time to try to catch up on posts.  This was LD's 4th birthday.  Yes, right now I am planning his 6th, so I am a bit late :)  

We had a Spiderman-themed Basketball party.  The kids watched an exhibition game at the college and then got to play around on the court at half-time.  We made little goodie bags with snacks for the game.  Afterwards, we took a break to enjoy some cake and watch an old spiderman tv episode on a projector screen.  


The Cake:  The Bottom layer was 9 x 13 two layer cake with one layer chocolate and one vanilla.  vanilla butter cream. The top layer was a 12 inch oval of red velvet cake with cream cheese frosting.  The whole cake was decorated with marshmallow fondant.  I used a fondant mold to get the "brick" look into the skyline and then hand-cut the buildings.  The mask used fondant for the eyes and a black royal icing for the web detail.  


I made several batches of fondant and colored them in advance to let the colors deepen. In fact, both the fondant and the royal icing for the cookies needed to be made in advance so that the colors would deepen.  I used Americolor Super Red and Super Black.  I think they produce the deepest colors using the smallest amount of product.  


Here are the cookies.  It's a long-standing tradition now ( about five or six years) that I make these shortbread cookies for the kids' birthday.  The recipe is very straight forward.  I use Ina Garten's Shortbread cookie.  I usually ice them with royal icing and sometimes use sanding  or colored sugar to decorate.


Here they are all wrapped and ready for favors.


Friday, May 9, 2014

Teacher Appreciation Gifts

This is Teacher Appreciation Week and I wanted to share what I put together for D and L's teachers.


I found these cute tags (via pinterest) with a Mason jar theme.  I bought a case of the new Perfection green pint jars and added the drinking straw/lid and used the rings that came with the jars.  I added in a few single serve packs of lemonade and iced tea mix into the jars.  Along with the drink container, I made a batch of Lemon Shortbread cookies like these.  I added some lemon extract and zest to the shortbread dough and added lemon juice to the icing glaze.  Sweet, tart and buttery all at the same time..yum!

Lemon Shortbread Cookies
I added a ribbon and flower to the jar for a little decoration.  I thought they turned out really well and the teachers really enjoyed them!

Sunday, March 9, 2014

Chocolate Hamentaschen


Chocolate Hamentaschen (Adapted from The Frugal Ima's Perfectly Parve Chocolate cookies)

Ingredients:
1 cup shortening
1 c white sugar
1/2 c brown sugar
2 eggs
2 tbsp vanilla extract
2 c all-purpose flour
3/4 c cocoa powder
3/4 tsp baking soda
1/2 tsp salt


Filling:

1 cup confectioner's sugar
2-3 Tbs. Water
1 tsp. flavor extract of choice (i.e.vanilla, peppermint, etc.)
sprinkles or other toppings

Cream the shortening and sugar together until fluffy.  Add in eggs and vanilla and combine thoroughly.  Sift together dry ingredients and mix into shortening mixture just until combined.  Divide the dough in half, wrap in plastic and chill in the fridge at least a half an hour.  


Unwrap the chilled dough onto a floured surface.  Roll out the dough to a 1/4" thickness.  Cut using 1 1/2" round cutter.   Pinch the rounds to form a triangular shape.  Bake at 350 degrees for 10 minutes.   Immediately after removing from the oven, use the end of a wooden spoon to make an indentation in the center of the cookie.  Transfer the cookies to a cooling rack. 

Mix the filling in a small bowl.  Spoon the icing into the cavity of each cookie.  Add sprinkles or other toppings, if desired.  Allow icing to set.  Store cookies in an airtight container. 


Monday, February 24, 2014

Menu Plan Monday - 2/24/14

Weekend was pretty busy.  We had a Girl Scout event yesterday.  Our troop did a presentation on Brazil and we made brigadeiros.  It all went really well and the girls had a blast!


Menu:

Monday:  Meatless Goulash - Substitute a bag of Boca crumbles for the ground meat makes the recipe super quick and easy for Monday.  I'll add some veggies on the side.

Tuesday:  Grilled chicken, salad, Asian sesame dressing, brown rice

Wednesday:  Pasta night

Thursday:  Back to back after school events today, so I plan on packing a picnic.  Calzones, crudite


Friday:  Not sure yet.  Perhaps grilling if the weather cooperates.

Looking for more menu plans, please visit MPM at orgjunkie.com

Brigadeiros - Brazil GS World Thinking Day

World Thinking Day for our Girl Scout troop this weekend went really well, although it was sweltering hot at the Lodge.  Brazil was our country and we made brigadeiros for our sample treat.  They were a hit!  Several people came up for the recipe.  I don't know why I didn't think to make recipe cards for the table.  They are super easy to make and the girls helped with the rolling out and coating in sprinkles part.


Brigadeiros

1 can (14 oz.) sweetened condensed milk
4 Tbs. cocoa powder
1 Tbs. Butter
sprinkles

Add the milk, cocoa and butter in a heavy-bottomed sauce pan.  Heat the mixture on medium-high heat, stirring constantly.  Allow the mixture to simmer for about 5-10 minutes, stirring to make sure it doesn't stick to the bottom of the pot and burn.  The mixture will thicken and begin to pull away from the pan when it's ready.  Pour onto a greased jelly-roll pan or baking sheet.  Allow to cool completely before forming into balls (about 1 teaspoon-sized) and rolling in sprinkles (either rainbow or chocolate)  or any other topping of your choosing.  The candy is slightly soft and sticky, so a little cooking spray on the hands may help to roll the balls out.  You can also pop the mixture in the fridge for a bit to firm it up.  Storing them, in a sealed container, in the fridge or freezer until ready to serve will keep them fresh.


Monday, February 17, 2014

Menu Plan Monday - 2/17/14


Menu: (quick post)

Monday : Veggie Quiche with crudite
Tuesday: Grilled Chicken and asparagus
Wednesday:  Baked Fish with brown rice
Thursday: Pasta night
Friday: Pot roast with veggies, challah

This week I plan on making Brigadeiros for the GS World Thinking Day (our troop is focusing on Brazil).


For more menus or recipes, please visit MPM at orgjunkie.com

Saturday, February 15, 2014

Homemade Marshmallow Heart Pops


Homemade Marshmallow Heart Pops

I made these treats for a school Valentine's Day event.  I think they turned out really sweet!

I started with this recipe for marshmallows.  I added a touch of pink food coloring to the mixture after I added the vanilla.  You could certainly choose to add different flavor extracts to the marshmallow mixture to change it up.  I pour the marshmallow in to a large 9" x 13" pan that has been greased and lined with parchment or waxed paper.  The pan gets dusted with confectioner's sugar and I allow the marshmallow to sit over night to dry.  The next day, I used a small heart-shaped cutter to form the shapes.


Place the hearts on lollipop sticks and line up on a cooling rack set over a baking sheet.


Melt a bit of chocolate or confectioner's coating and drizzle over the heart pops.  You can add a sprinkle of mini hearts before the chocolate sets and you are all done.  Get ready to share!